Did you come to my blog looking for blog posts? Here they are, I guess. This is where I post traditional, long-form text that isn't primarily a link to someplace else, doesn't revolve around audiovisual media, and isn't published on any particular cadence. Just words about ideas and experiences.
How to transcribe a Podcast with Whisper on an ARM Mac using Homebrew
Goofing around with podcast transcripts today. Here's what I did to transcribe version 26 of the Breaking Change podcast, after a couple hours of being mad at how hard the Internet was making it:
- Run
brew install whisper-cpp, because I'm fucking sick of cloning one-off Python repos. - Download a model and put it somewhere (I chose
ggml-large-v3-turbo-q8_0.binbecause it's apparently slower but more accurate than "q5", whatever the hell any of this means) - Since your podcast is probably an MP3, you'll have to convert it to a WAV file for Whisper. Rather than create an interstitial file we'd have to clean up later, we'll just pipe the conversion from
ffmpeg. That bit of the command looks like:ffmpeg -i "v26.mp3" -ar 16000 -ac 1 -f wav - - Next is the actual Whisper command, which requires us to reference both the Metal stuff (which ships with
whisper-cpp) as well as our model (which I just put in iCloud Drive so I could safely forget about it). I also set it to output SRT (because I wrote a Ruby gem that converts SRT files to human-readable transcripts) and hint that I'm speaking in English. That bit of the command looks like this:GGML_METAL_PATH_RESOURCES="$(brew --prefix whisper-cpp)/share/whisper-cpp" whisper-cpp --model ~icloud-drive/dotfiles/models/whisper/ggml-large-v3-turbo-q8_0.bin --output-srt --language en --output-file "v26.srt"
Here's the above put together into a brief script I named transcribe-podcast that will just transcribe whatever file you pass to it:
# Check if an input file is provided
if [ -z "$1" ]; then
  echo "Usage: $0 input_audio_file"
  exit 1
fi

input_file="$1"
base_name=$(basename "$input_file" | sed 's/\.[^.]*$//')

# Convert input audio to 16kHz mono WAV and pipe to whisper-cpp
ffmpeg -i "$input_file" -ar 16000 -ac 1 -f wav - | \
  GGML_METAL_PATH_RESOURCES="$(brew --prefix whisper-cpp)/share/whisper-cpp" \
  whisper-cpp --model ~/icloud-drive/dotfiles/models/whisper/ggml-large-v3-turbo-q8_0.bin \
  --output-srt --language en --output-file "$base_name" -
If you're writing a script like this for yourself, just replace the path to the --model flag and you too will be able to do cool stuff like this:
$ transcribe-podcast your-podcast.mp3
As for performance, on an M4 Pro with 14 CPU cores, the above three-and-a-half hour podcast took a bit over 11 minutes. On an M2 Ultra with 24 cores, the same file was finished in about 8 minutes. Cool.
How to add a headrest to a Steelcase Leap chair
The Steelcase Leap (v2) is a good office chair in a world of mostly bad office chairs. I've been using it since 2020 and I don't love it, but I definitely hate it less than every other office chair I've ever owned. That's one reason I find myself vexed that Steelcase does not offer an after-market headrest for the chair (and no longer seems to let you configure one with a built-in headrest). In fact, so few office chairs offer headrests that I was briefly tempted to buy a "gaming chair" (do not buy a gaming chair).
And if you're reading this and identify as an Online Ergonomics Expert, I know you're champing at the bit to tell me, "headrests are bad, actually."
But if you're like me and have an incredibly large and heavy head, and/or you spend most of your time at the computer leaning back and pondering what to do next between furious-but-sporadic bouts of typing, then I'm happy to report I have a solution for what ails you.
I tried four different DIY solutions for slapping a third-party headrest onto the Steelcase Leap that were dreamed up by randos on Reddit, but only one of them worked. And the best part is that the winning thread only requires the headrest and a couple of zip ties, meaning that this approach shouldn't void your warranty by requiring you to drill into the back of the chair.
All you need:
- This exact headrest made by Engineered Now
- These heavy-duty zip ties
- These images and maybe also these images that more-or-less tell you how to secure the headrest with the ties to the chair itself
If you're visiting here from a search engine or an AI assistant's generous citation, I hope you find this helpful! I can only speak for myself, but I am quite glad that I didn't have to buy a new chair just to keep my 15-pound head upright at the end of a long day.
Apple's own documentation doesn't know about watchOS 11's biggest feature
From Apple's support page for connecting an Apple Watch to Wi-Fi:
Note: Apple Watch won't connect to public networks that require logins, subscriptions, or profiles. These networks, called captive networks, can include free and pay networks in places like businesses, schools, dorms, apartments, hotels, and stores.
This has indeed been my experience ever since buying the Series 0 in 2015. But because the Apple Watch can piggyback off its parent iPhone for data over Bluetooth—and because most people are never more than a few feet from their phone—odds are you've never even noticed that attempting to join a Wi-Fi network with a captive portal would silently fail instead of bringing up a WebKit view.
The Empowered Programmer citations
Update: As promised, the talk is now up! Go check it out if you want.
I meant to be more on top of it than this, but thanks to some day-of turbulence, I failed to do two things before my Rails World talk on Thursday:
- Post this promised post of links to my blog so people could see all the various tools and advice I'd referenced
- Redirect Becky's old site (buildwithbecky.com) to the new one (betterwithbecky.com)
Whoops!
Anyway, better late than never. Here are the things I mentioned in the talk:
- Better with Becky, the new product we just launched
- Test Double the leading Ruby & Rails consultancy I had the privilege of co-founding
- My Active Storage advice
- My podcast, Breaking Change (Apple Podcasts | Spotify | Overcast | Youtube)
- My free monthly newsletter, Searls of Wisdom
Of course, most of you reading this weren't in the audience in Toronto and haven't seen the talk. Sit tight, I'm told that Rails World's turnaround time for getting the video online won't be too long. 🤞
There are a bunch of other things about the app's design and architecture that I had to cut for time and which I hope to share in the future, as well as a behind-the-scenes look at how I put together the presentation. Stay tuned!
Drive-by Active Storage advice
This post is also available in Japanese, care of Shozo Hatta
I'm working on a conference talk and there won't be time for me to detail each and every piece of advice I've accrued for each technical topic, so I'm going to dump some of them here and link back to them from the slides.
Today's topic is Active Storage, the Ruby on Rails feature that makes it easy to store user-generated assets like photos and videos in the cloud without clogging up your application or database servers.
Before you do anything, read this absolutely stellar post describing how to get the most out of the feature and avoid its most dangerous foot-guns.
Here goes.
A decoupled approach to relaying events between Stimulus controllers
Part of the allure of Stimulus is that you can attach rich, dynamic behavior to the DOM without building out a long-lived stateful application in the browser.
The pitch is that each controller is an island unto itself, with each adding a particular kind of behavior (e.g. a controller for copying to clipboard, another for displaying upload status, another for drag-and-drop reordering), configured entirely via data attributes. This works really well when user behavior directly initiates all of the behaviors a Stimulus controller needs to implement.
This works markedly less well when a controller's behavior needs to be triggered by another controller.
What one must pass to includes() to include Active Storage attachments
If you're using Active Storage, eager-loading nested associations that contain attachments in order to avoid the "N + 1" query problem can quickly reach the point of absurdity.
Working on the app for Becky's strength-training business, I got curious about how large the array of hashes being sent to the call to includes() is whenever the overall strength-training program is loaded by the server. (This only happens on a few pages, like the program overview page, which genuinely does contain a boatload of information and images).
Each symbol below refers to a reference from one table to another. Every one
that descends from :file_attachment is a reference to one of the tables
managed by Active Storage for
keeping track of cloud-hosted images and videos. Those hashes were extracted
from the
with_all_variant_records scope that Rails provides.
I mean, look at this:
[{:overview_video=>
   {:file_attachment=>
     {:blob=>
       {:variant_records=>{:image_attachment=>:blob}, :preview_image_attachment=>{:blob=>{:variant_records=>{:image_attachment=>:blob}}}}}}},
 {:overview_thumbnail=>
   {:file_attachment=>
     {:blob=>
       {:variant_records=>{:image_attachment=>:blob}, :preview_image_attachment=>{:blob=>{:variant_records=>{:image_attachment=>:blob}}}}}}},
 {:warmup_movement=>
   {:movement_video=>
     {:file_attachment=>
       {:blob=>
         {:variant_records=>{:image_attachment=>:blob}, :preview_image_attachment=>{:blob=>{:variant_records=>{:image_attachment=>:blob}}}}}},
    :movement_preview=>
     {:file_attachment=>
       {:blob=>
         {:variant_records=>{:image_attachment=>:blob}, :preview_image_attachment=>{:blob=>{:variant_records=>{:image_attachment=>:blob}}}}}}}},
 {:workouts=>
   {:blocks=>
     {:mobility_movement=>
       [{:primary_equipment=>
          {:equipment_image=>
            {:file_attachment=>
              {:blob=>
                {:variant_records=>{:image_attachment=>:blob},
                 :preview_image_attachment=>{:blob=>{:variant_records=>{:image_attachment=>:blob}}}}}}},
         :secondary_equipment=>
          {:equipment_image=>
            {:file_attachment=>
              {:blob=>
                {:variant_records=>{:image_attachment=>:blob},
                 :preview_image_attachment=>{:blob=>{:variant_records=>{:image_attachment=>:blob}}}}}}},
         :tertiary_equipment=>
          {:equipment_image=>
            {:file_attachment=>
              {:blob=>
                {:variant_records=>{:image_attachment=>:blob},
                 :preview_image_attachment=>{:blob=>{:variant_records=>{:image_attachment=>:blob}}}}}}},
         :movement_video=>
          {:file_attachment=>
            {:blob=>
              {:variant_records=>{:image_attachment=>:blob},
               :preview_image_attachment=>{:blob=>{:variant_records=>{:image_attachment=>:blob}}}}}},
         :movement_preview=>
          {:file_attachment=>
            {:blob=>
              {:variant_records=>{:image_attachment=>:blob},
               :preview_image_attachment=>{:blob=>{:variant_records=>{:image_attachment=>:blob}}}}}}}],
      :exercises=>
       {:exercise_options=>
         {:movement=>
           [{:primary_equipment=>
              {:equipment_image=>
                {:file_attachment=>
                  {:blob=>
                    {:variant_records=>{:image_attachment=>:blob},
                     :preview_image_attachment=>{:blob=>{:variant_records=>{:image_attachment=>:blob}}}}}}},
             :secondary_equipment=>
              {:equipment_image=>
                {:file_attachment=>
                  {:blob=>
                    {:variant_records=>{:image_attachment=>:blob},
                     :preview_image_attachment=>{:blob=>{:variant_records=>{:image_attachment=>:blob}}}}}}},
             :tertiary_equipment=>
              {:equipment_image=>
                {:file_attachment=>
                  {:blob=>
                    {:variant_records=>{:image_attachment=>:blob},
                     :preview_image_attachment=>{:blob=>{:variant_records=>{:image_attachment=>:blob}}}}}}},
             :movement_video=>
              {:file_attachment=>
                {:blob=>
                  {:variant_records=>{:image_attachment=>:blob},
                   :preview_image_attachment=>{:blob=>{:variant_records=>{:image_attachment=>:blob}}}}}},
             :movement_preview=>
              {:file_attachment=>
                {:blob=>
                  {:variant_records=>{:image_attachment=>:blob},
                   :preview_image_attachment=>{:blob=>{:variant_records=>{:image_attachment=>:blob}}}}}}}]}}}}}]
By my count, that's 167 relationships! Of course, in practice it's not quite this bad since the vast majority are repeated, and as a result this winds up executing "only" 50 queries or so. But that's… a lot!
Broadcasting real-time database changes on a budget
While building Becky's (yet unreleased) app for her strength training business, I've been taking liberal advantage of the Hotwire combo of Turbo and Stimulus to facilitate dynamic frontend behavior without resorting to writing separate server-side and client-side apps. You can technically use these without Rails, but let's be honest: few people do.
Here are a few capabilities this broader suite of libraries give you, in case you're not familiar:
- Rails Request.js offers a minimal
API for sending conventional HTTP requests from JavaScript with the headers Rails
expects like
X-CSRF-Tokenhandled for you - Turbo streams can send just a snippet of HTML over the wire (a fetch/XHR or an Action Cable socket) to re-render part of a page, and support was recently added for Custom Actions that sorta let you send anything you want over the wire
- The turbo-rails gem adds some very handy glue code to broadcast model updates in your database and render Turbo streams to subscribers via an Action Cable socket connection
- Stimulus values are synced with the DOM as data attributes on the owning controller's element, and Object serialization is supported (as one might guess) via JSON serialization. Stimulus controllers, by design, don't do much but they do watch the DOM for changes to their values' data attributes
Is your head spinning yet? Good.
Photo Shuffle is still broken in the iOS 18 Lock Screen
For iOS 16, Apple overhauled the iPhone lock screen and the one feature they shipped that I really, really wanted was the ability to shuffle depth-effect photos of my spouse. It's called "Photo Shuffle", and you get there by adding a new lock screen, tapping "Photo Shuffle", and selecting "People". The Big Idea is that your phone would use machine learning to select great photos and then apply a depth effect (i.e. clipping the subject in front of the time). However, instead of having users select "People & Pets" from a standard iCloud Photos picker, you get an arbitrary smattering of a couple dozen randos in a bare bones custom UI.
So what's my beef with this feature? Over the course of 2 years and 7 devices, my wife has never been among the options presented to me. Can't select her. Doesn't matter that I've named her in the Photos app. Or favorited her. My library has over 25,000 photos of her for crissakes. Who can I pick from instead? Well, there are least 3 kids whose names I never knew and for whom Becky appears to have had as Spanish students for a single semester in 2009. Great job, everyone.
As it turns out, I am not alone.
I first encountered this bug in iOS 16 developer beta 1 on June 6, 2022. It has persisted across four iPhones and three iPads, even when set up fresh, not-from-backup. Not only that, I always see the exact same list of people I don't care about. Most of whom I never even bothered to name in Photos, which suggests the bug lives in the cloud, which is just great.
Jason Snell reported on this feature's problematic design last year (during iOS 17 beta season), for MacWorld:
Photo Shuffle's method of offering people to display appears utterly broken. It offered my wife a small number of faces, most of whom were completely random and fairly uncommon. She's got hundreds, if not thousands, of pictures of me and our kids on her phone, and yet we weren't among the faces offered. And if the faces you're looking for aren't in Photo Shuffle's very small list of options, there's no recourse. You're stuck.
Well, here we are, one year later, and I'm unhappy to report: Photo Shuffle is still broken in iOS 18. It doesn't seem to have been touched at all.
When people talk about the inscrutability of machine-learning and AI as being problematic, this is as practical an example as I can think of. All I want to do is shuffle photos of my wife on my lock screen, but there's no action I can take as a user—no amount of hardware purchases, software updates, or device factory resets—to make that happen. Apple Support can't do anything either. I doubt the engineers who worked on it could. Whenever anyone says "AI", everyone involved quickly absolves themselves of responsibility—it's a black box.
Recipe: Swapping out a model div with Turbo Streams and Stimulus
Rails + Hotwire is very capable of dynamic behavior like replacing a component in the DOM by sending HTML over-the-wire in response to a user action, but the fact it requires you to touch half a dozen files in the process can make the whole thing feel daunting. Rails itself has always been this way (with each incremental feature requiring a route, model, controller, view, etc.), but I've been using it long enough that I sometimes forget that—similar to learning a recipe—I originally needed months of intentional practice to internalize and gain comfort with the framework's most routine of workflows.
So, like a recipe card, here is a reusable approach to swapping out a <div>
rendered by a Rails partial with a turbo stream whenever a user selects an
alternate model from an input (specifically, a select) using Turbo 8, Stimulus
1.3, and Rails 7.1.
The ingredients
- Partial: Extract a partial to be rendered inside the element you wish to replace, so that both your view and your turbo stream can render the same markup for a given model
- Routing: Add a route specifying a one-off controller action that will respond with a turbo stream
- Controller Action: Define an action that takes your model ID and the DOM element's ID and responds with a turbo stream to update the element's contents
- Turbo Stream View: Create a turbo stream view for the action that invokes the partial
- Stimulus Controller: Create a generic Stimulus controller that can swap any model type when given a path, ID, and container
- View: Wire up the Stimulus controller to the view's select box and the to-be-replaced element
That's it, 6 key ingredients. If you're curious, step 5 contains the most magic flavoring. 🪄
The actions
Ingredients in hand, let's walk through each of the steps needed to go end-to-end with this feature.
1. Set Up the Rails Partial
First, create a partial that you want to render inside the <div>. Let's assume
we want users to be able to change out a generic model named Item, which has
a conventional ItemsController.
In that case, let's place a partial that renders the details about an item alongside
the controller's views, in _detail.html.erb:
<!-- app/views/items/_detail.html.erb -->
<div>
  <%= item.title %>
  <!-- Other item stuff… -->
</div>
2. Add Routes
Next, we'll add the necessary route for the detail action:
# config/routes.rb
resources :items do
  get :detail, on: :collection
end
This will define a path helper detail_items_path, which works out to
"/items/detail".
Note that I threw this on the :collection so that our stimulus controller can
more easily specify the URL via query parameters instead of interpolating a
fancier member route (e.g. "items/42/detail").
3. Define the Controller Action
With the route defined, we'll add a simple controller action that only responds to turbo stream requests.
Here's what that might look like:
# app/controllers/items_controller.rb
class ItemsController < ApplicationController
  def detail
    @dom_id = params[:dom_id]
    @item = Item.find(params[:id])
  end
end
This dom_id param might throw you off at first, but it's important to keep in
mind that unique HTML IDs are the coin of the realm in
Turbo-land. You'll see how it
gets set later, in step 5.
4. Create the Turbo Stream View
To finish the route-controller-view errand, we'll create a view for the detail action,
with the turbo_stream.erb extension instead of html.erb:
<!-- app/views/items/detail.turbo_stream.erb -->
<%= turbo_stream.update @dom_id do %>
  <%= render partial: "detail", locals: { item: @item } %>
<% end %>
Because both the turbo stream and the original view need to render items in
exactly the same way, detail.turbo_stream.erb view responds by rendering the
_detail.html.erb partial. If you inspect the HTML that comes over the wire,
you'll see that only the turbo stream tag containing this partial is
transferred, which often means barely more data is transferred than had we
implemented this as a single-page JavaScript by making a similar HTTP request
for JSON.
5. Define the Stimulus Controller
In order for users' selections to have any effect, we need JavaScript. We could
write a Stimulus controller that's coupled specifically to this Item model,
but it's no more work to make it generic, which would allow us to reuse this
functionality elsewhere in our app. So let's do that.
You can do this the hard way by using the browser's built-in fetch API to
construct the URL, set the Accept header to text/vnd.turbo-stream.html, and
replace the element's innerHTML in the DOM, but that's easy to screw up (in
fact, I screwed it up twice while writing this). So instead, I'd recommend pulling
in the requestjs-rails gem, by first
chucking it in your Gemfile alongside any other front-end related gems:
gem "requestjs-rails"
Here's the final Stimulus controller. Deep breath, as I haven't explained all this yet:
// app/javascript/controllers/model_swap_controller.js
import { get } from '@rails/request.js'
import { Controller } from '@hotwired/stimulus'

export default class ModelSwapController extends Controller {
  static targets = ['container']
  static values = {
    path: String,
    originalId: String
  }

  swap (event) {
    const modelId = event.currentTarget.value || // Value from input action
      event.detail?.value || // Value from custom event (e.g. hotwire_combobox)
      this.originalIdValue // Fallback to original value if input value is cleared

    get(this.pathValue, {
      query: {
        id: modelId,
        dom_id: this.containerTarget.id
      },
      responseKind: 'turbo-stream'
    })
  }
}
That get function from @rails/request.js handles all the housekeeping you
might hope it would. When I switched to it, the fact it worked the
instant I plopped it in gave me Dem Magic Vibes that keep me coming back to
Rails 18 years in.
This controller also contains two values and a target:
pathvalue: this is just a URL, which we'll set to our intentionally-parameter-freedetail_items_pathoriginalIdvalue: this is theItemID that was first rendered when the page loaded. By having this available as a fallback, we'll be able to gracefully handle the user choosing a blank option from theselectby restoring the original itemcontainertarget: this is the DOM element containing the partial we're going to swap out. Note that it must have a uniqueidattribute, which we're including in our request to the server asdom_id
If this doesn't make perfect sense, I recommend wiring it up anyway and getting it working first, then debugging to inspect the values in motion.
6. Wiring up the Stimulus Controller in the View
Finally, we'll visit the original view from which the _detail.html.erb partial
was initially extracted.
Right off the bat, you might notice that I like to use content_tag whenever I
need to specify numerous attributes with Ruby expressions, as it requires
far fewer <%=%> interpolations than specifying a literal <div>:
<!-- app/views/items/show.html.erb -->
<%= content_tag :div, data: {
    controller: "model-swap",
    model_swap_path_value: detail_items_path,
    model_swap_original_id_value: @item.id,
  } do %>
  <%= collection_select :item, :id, Item.all, :id, :title,
    {include_blank: true},
    {data: {action: "model-swap#swap"}} %>

  <div id="<%= dom_id(@item, "detail") %>" data-model-swap-target="container">
    <%= render partial: "detail", locals: { item: @item } %>
  </div>
<% end %>
The above will probably look immediately familiar to anyone who's done a lot of work with Stimulus before and utterly arcane otherwise. Helping you sort out the latter is beyond the scope of this article, though. Ask ChatGPT or something.
The only thing in the above template that wasn't completely preordained by the
first 5 steps was the id attribute of the wrapping div element, so I'll
explain that here. For illustration purposes, I set the container div to
dom_id(@item, "detail") (which would work out to something like
"detail_item_42") to give an example of something that's likely to be unique,
but in truth, the most appropriate ID will depend on what's going on in the
broader page. For example, in the UI that inspired this blog post, I am allowing
users to replace any of a variable array of items across 3 options, so my IDs
are based on those indices, like option_2_item_4, as opposed to the database
ID of any models. All that really matters is that the ID be unique.
That's it!
Pulling off functionality like this with Turbo and Stimulus feels extra delightful, I think, if you (like so many of us) spent the last decade assuming that this kind of snappy, dynamic behavior would require a front-end JavaScript framework that would live forever and keep track of a duplicated copy of the app's state. Instead, because the server-side rendered view can draw the entire page without any JavaScript involved, any client-side changes we introduce to the state of the DOM can operate on attributes first defined by the view, keeping the entire source of truth of the current application state in one place (the DOM) instead of two (a server database and in-memory JavaScript objects).
Anyway, when it works, it's great. And when the lego bricks aren't snapping together for whatever reason, it's infuriating. Which maybe makes Hotwire the most Rails-assed extension to the framework since Rails itself. If you find yourself losing a bunch of time to what seem like trivial naming issues, just know that you're not alone. This stuff takes practice to get used to.
If you've worked through this guide, hopefully you have a functioning feature that you can continue iterating on. If you stumbled over any errata above, please let me know.
Make Command-Return submit your web form
Hello, I just wanted to say that if you want your web app to feel Cool and Modern, one of the easiest things you can do is make it so that Mac users can hit command-return anywhere in the form to submit it.
Some web sites map this to control-enter for other platforms, and that's fine, but I don't bother. Truth be told, I used to bother, but after adding it to a few web apps years ago, I actually had multiple Windows and Linux users complain to me about unintended form submissions.
I am not making a comment on the sophistication of non-Apple users, but I am saying that if you just stick this code at the top of your app, it will make it more Exclusive and feel Snappier and I will thank you for it.
Here, just copy and paste this. Don't even bother reading it first:
document.addEventListener('keydown', (event) => {
  if (event.key === 'Enter' && event.metaKey) {
    if (!document.activeElement) return
    const closestForm = document.activeElement.closest('form')
    if (closestForm) {
      event.preventDefault()
      closestForm.requestSubmit()
    }
  }
})
Why I just uninstalled my own VS Code extension
After a little over a year of prodding by Vini Stock to
ship a Standard Ruby add-on for Ruby
LSP, and thanks to a lot of help from
Shopify's Ruby DX team, I've
finally done it! In fact, so long as your Gemfile's version of standard is
at least 1.39.1, you already have the new Ruby LSP add-on. It's built-in!
Ruby LSP supports any editor with language server support, but configuration varies from editor to editor. Since VS Code is relatively dominant, I added some docs on how to set it up, but most Ruby LSP users will just need these settings to select Standard as their linter and formatter:
"[ruby]": {
  "editor.defaultFormatter": "Shopify.ruby-lsp"
},
"rubyLsp.formatter": "standard",
"rubyLsp.linters": [
  "standard"
]
I've been using this configuration for a bit over a week and I've decided: it's time to uninstall my own bespoke extension that we launched early last year .
I've also updated Standard's README to explain why the new Ruby LSP add-on is superior to our own built-in language server. In short, the Ruby LSP add-on supports pull diagnostics and code actions, and the built-in server does not.
Standard Ruby's built-in language server and existing VS Code extension will continue to work and be supported for the forseeable future, but it doesn't make much sense to invest heavily into new features, when the Ruby LSP add-on will get them "for free".
Why make the switch?
Three reasons:
- Capability. Ruby LSP centralizes the pain of figuring out how to build a full-featured, performant language server. The issue isn't that implementing a basic STDIO server is All That Hard, it's that rolling your own utilities like logging, debugging, and test harnesses are a huge pain in the ass. By plugging into Ruby LSP as an add-on, library authors can integrate with simpler high-level APIs, exploit whatever LSP capabilities it implements and whatever utilities it exposes, and spare themselves from re-inventing Actually Hard things like project-scoped code indexing (instead, leveraging Ruby LSP's robust, well-tested index)
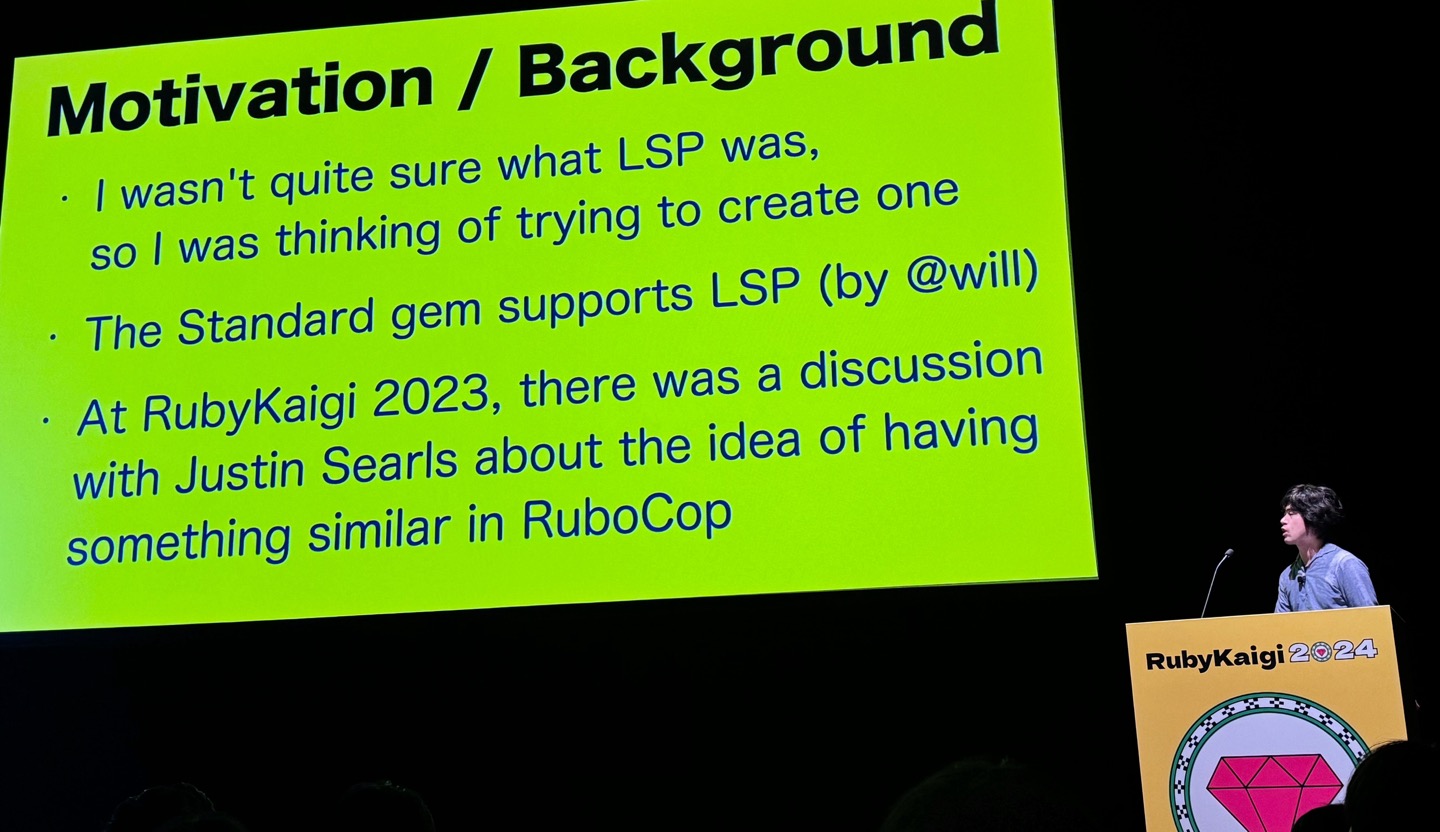
- Duplication. RuboCop maintainer Koichi Ito gave the closest thing to a barn-burner presentation about language servers at RubyKaigi that I could imagine, where he discussed the paradoxical wastefulness of every library author hand-rolling the same basic implementation while simultaneously needing their own tightly-integrated language server to push their tools' capabilities forward. In the case of Standard Ruby, we're squeezed on both sides: at one end, a Ruby LSP add-on would be a more convenient, batteries-included solution than publishing our own extension; at the other, nuking our own custom LSP code and delegating to RuboCop's built-in language server would unlock capabilities we couldn't hope to provide ourselves
- Maintainability. You think I enjoy maintaining any of this shit?
Embracing defeat
So yeah, in the medium-term future, I see Ruby LSP and RuboCop as being better-positioned to offer a language server than Standard itself. Thanks to Will Leinweber's implementation, we may have been there first, but I have nothing to gain by my spending free time to ensure our server is somehow better than everyone else's. In the long-term, even more consolidation seems likely—which probably means Ruby LSP will become dominant. But ultimately, they're called language servers for a reason, and if Ruby shipped with a built-in language server (and an API that any code could easily plug into), it could prove a competitive advantage over other languages while simultaneously enabling a new class of tools that could each pitch in to enhance the developer experience in distinct, incremental ways.
On a human level, I think it's important not to associate the prospect of retiring one's own work with feelings of failure. Code is a liability, not an asset. Whenever I can get by with less of it, I feel relief after discarding it. If relief isn't your default reaction to a competing approach winning out on the merits (and it's understandable if it isn't; pride of authorship is a thing), I encourage you to figure out how to adopt this mindset. There are far too many problems out there worth solving to waste a single minute defending the wrong solution.
Anyway, go try out Standard with Ruby LSP and tell me how it goes! I'll be bummed if I didn't manage to break at least something.
Pro-tip: make your debug print statements POP 🍾
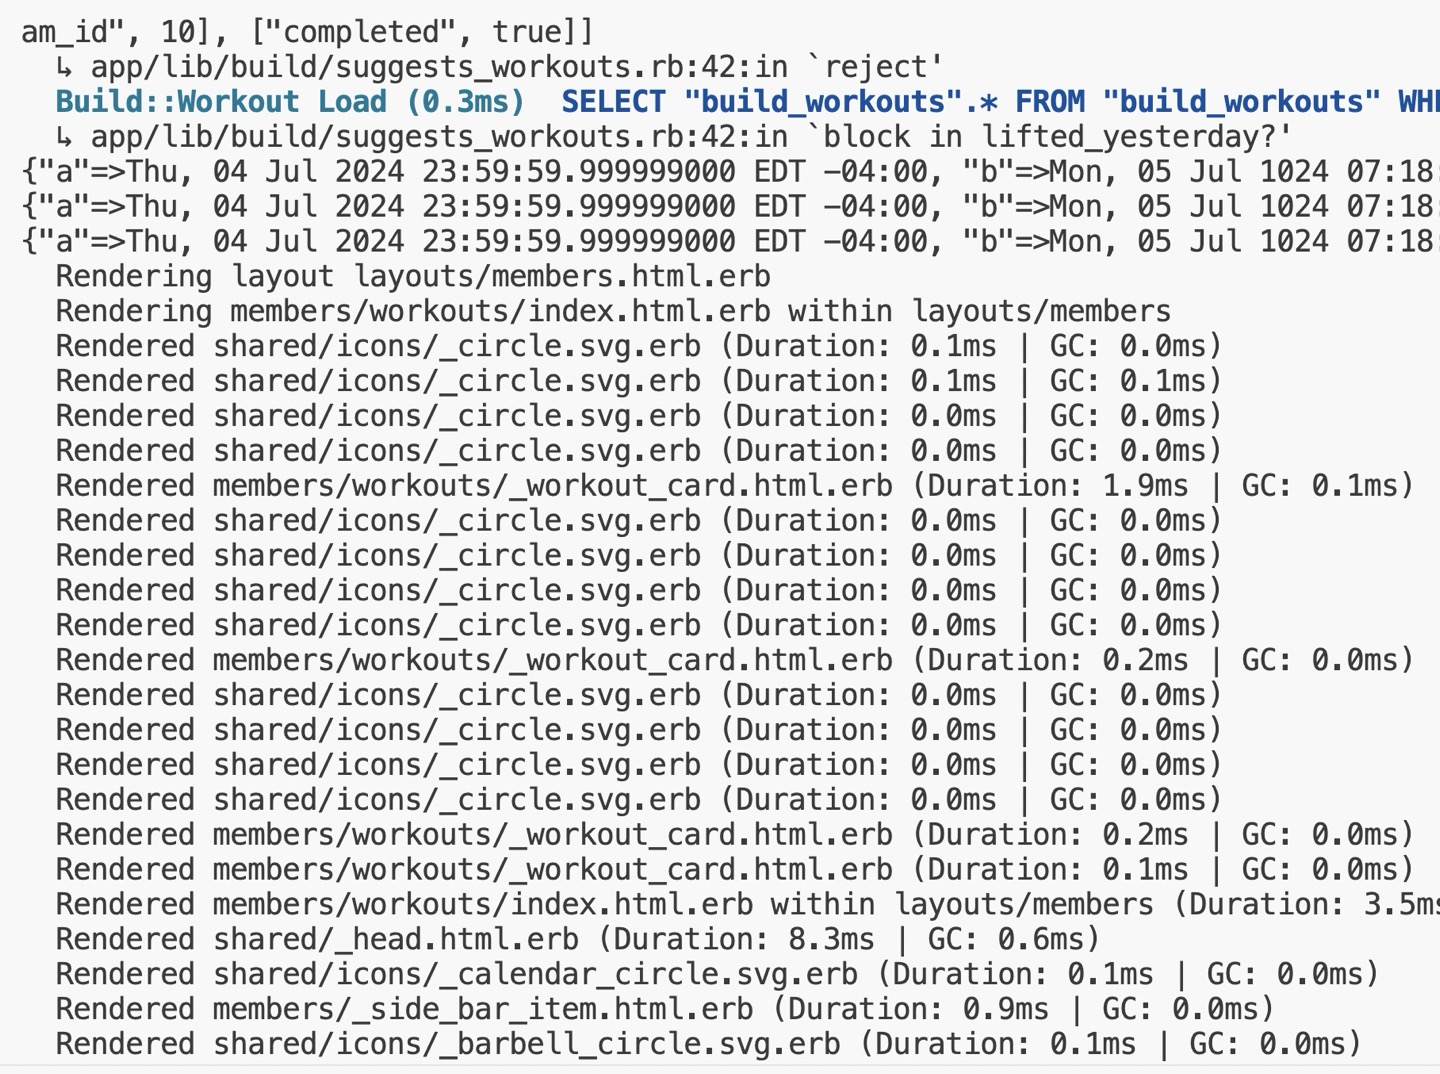
This isn't an exciting idea, but since I know a lot of puts debuggerers who are probably accustomed to printing plain text into a sea of log noise, I thought I'd share this PSA: making your print statements visually distinctive makes them easier to spot.
If you're trying to log a value during the request/response lifecycle of a
Rails development server, there's a lot of chatter for
every page load. So instead of passing something to puts or pp and spraining
a squint muscle to find your print statement in the server logs, do something to
make it stand out!
You could reach for a gem like awesome_print for this, but IMNSHO there's no need to add another dependency just for this.
Since I use a white-background terminal, my quick solution was to define a
method that pretty-prints its argument with a black background (called
Kernel#buts). Since I only need this for my development server, I chucked it
in a development-only initializer:
# config/initializers/buts.rb

return unless Rails.env.development?

module Kernel
 # Make your output stand out more in the Rails server console
 def buts(obj)
   black_background_white_text = "\e[30;47m"
   reset = "\e[0m"
   puts "#{black_background_white_text}#{obj.pretty_inspect}#{reset}"
 end
end
Here's the before-and-after. At a glance, can you even see what I'm trying to print in the first screenshot?

There you go. Life's too short to be hunting through logs for one-off print statements. 🔎
Instantiate a custom Rails FormBuilder without using form_with
I'm building a Rails app using Tailwind, which works really well for almost everything out-of-the-box except forms, because—unless you relish the idea of repeating the exact same list of CSS classes for each and every field in your app—you're going to be left wanting for some way to extract all that messy duplication.
To that end, I've gradually built up a custom FormBuilder to house all my classes. (If you're looking for a starting point, here's a gist of what my TailwindFormBuilder currently looks like).
This works great when you're using form_with, because the custom form builder
will automatically take over when you set the builder option:
<%= form_with model: @user, builder: TailwindFormBuilder do |form| %>
<% end >
And if you set it globally with ActionView::Base.default_form_builder = FormBuilders::TailwindFormBuilder, the custom builder becomes the default.
Nifty!
But what about when you need to render input elements outside the context of a
proper form? Today, I wanted to render some checkboxes for a client-side UI that
would never be "submitted" and for which no object made sense as an argument to
form_with. Both immediately-available options are bad:
- Wrapping those checkboxes in an unnecessary
<form>tag by passing a dummy object toform_with, just for the side effect of having myTailwindFormBuilderinvoked, seemed kind of silly - Using one of Rails' built-in form helpers that work outside
form_with, like check_box_field, wouldn't invoke myTailwindFormBuilderand would therefore lack any of its CSS classes
Instead, I figured the best path forward would be to instantiate my form builder myself, even though that's not something the docs would encourage you to do to. So, I pulled up the FormBuilder#initialize source to see what arguments it needed:
def initialize(object_name, object, template, options)
  # …
end
Lucky for us, the only thing that really matters above is the template object,
which I (correctly, apparently) guessed could be passed as self from an ERB
file or a view helper.
Here's a little helper I made to instantiate my custom TailwindFormBuilder manually:
# app/helpers/faux_form_helper.rb

module FauxFormHelper
  FauxFormObject = Struct.new do
    def errors
      {}
    end

    def method_missing(...)
    end

    def respond_to_missing?(...)
      true
    end
  end

  def faux_form
    @faux_form ||= FormBuilders::TailwindFormBuilder.new(
      nil,
      FauxFormObject.new,
      self,
      {}
    )
  end
end
Explaining each of these arguments in order:
object_nameis set to nil, so thenameattribute of each input isn't wrapped in brackets (e.g.name="some_object_name[pants]")objectdoesn't matter, because this isn't a real form, so myFauxFormObjectjust responds as if every possible value is a real property, as well as toerrorswith an empty hash (which my form builder uses to determine when to highlight validation problems in red)templateis set toself, because that seems to workoptionsis left as an empty hash, because I don't appear to depend on any yet
This, in turn, lets me render consistently-styled form fields anywhere I like. As a result, this ERB:
<%= faux_form.check_box(:pants, checked: true) %>
Will render with all my default checkbox classes:
<input
  type="checkbox" value="1" checked="checked" name="pants" id="pants"
  class="block rounded-sm size-3.5 focus:ring-3 focus:ring-success checked:bg-success checked:hover:bg-success/90 cursor-pointer focus:ring-opacity-50   border border-gray-300 focus:border-success"
>
This incongruity has been a pebble in my shoe for a couple years now, so I'm glad to finally have a working solution for rendering Tailwind-ified fields both inside and outside the context of a proper HTML form.
Hope you find it helpful! 🦦🪄
Abusing Rails' content_for to push data attributes up the DOM
(I just thought of this today, and it's probably a terrible idea, but it seems to work. If you have reason to believe this is really stupid, please let me know!)
If you use Hotwired with Rails, you probably find yourself writing a lot of data attributes. This is great, because (similar to HTMX), it makes the DOM the primary source of truth and all that, but it sometimes imposes one of several vexing constraints on Stimulus components:
- Stimulus values must be set on the same element that specifies the controller
(i.e. whatever tag has
data-controller="cheese"must contain all its value attributes, likedata-cheese-smell-value="stinky"). This can be a problem when you'll only have easy access to the value at some later point in your ERB template. You can't just set it on a descendant - A Stimulus controller's targets (as in,
data-cheese-target="swiss") must be descendants of the controller, which can present design challenges when those targets appear in wildly different areas of the DOM, rendered by unrelated templates - Actions will only reach a controller if that controller is an ancestor of
whatever node triggered the event (i.e.
data-action="click->cheese#sniff"only works if it's placed on a descendant of the element withdata-controller="cheese")
I often find myself writing Stimulus components that would be easier to
implement if any of the above three things weren't true, and it can occasionally
lead me to wishing I could just chuck a data attribute near the top of the DOM
in my layout from an individual view or partial to ensure every element involved
shares a certain controller as a common ancestor. The alternatives are all
worse: storing one-off data attributes as values (which don't benefit from
Stimulus nifty Values API),
binding actions to global
events
(@window), or indirect inter-controller
communication.
An example problem
In my particular case, I have a bit of UI in my layout that resembles an iOS navigation bar. That bar will render a search field for certain views that have a number of elements that should be filterable by that search bar. The DOM tree looks like this:
- A top-level layout template:
- A navigation bar partial (that allows customization via
yield :navbar) - A view container containing the layout's primary
yieldto each view. Each view, in turn:- Renders whatever content they need
- [Optional] Configures whether the navigation bar renders a search field
for that page (via
content_for :navbar) - [Optional] Renders a list of elements that should be filterable
- A navigation bar partial (that allows customization via
Say this filtering behavior is governed by a Stimulus controller called
Filterable. This setup raises the question: where should the
data-controller="filterable" attribute go? It can't go in the navigation
bar, because then the target elements to be filtered would not descend from the
controller. It can't go in the view, because then the search bar's events
wouldn't trigger actions on the controller. Of course, it could
go on the layout's <body> tag, but what if only a handful of pages offer
filter functionality? Binding every possible Stimulus controller to the body of
every single page is obviously the wrong answer.
My solution? Abuse the hell out of Action View's content_for and yield
methods. (Here are the relevant Rails
guides
if you're not familiar).
My hacked-up solution
In short, I just encode my desired data attributes from views and partials as
JSON in a call to content_for and then render them upstream to the layout with
yield as attributes on the <body> (or some other common ancestor element).
In this very simple case, the only thing I needed to push up the DOM to a shared
ancestor was a data-controller="filterable", which just required this bit of
magic at the top of the view containing my filterable items:
<% json_content_for :global_data_attrs, {controller: "filterable"} %>
And this update to my layout:
<%= content_tag :body, data: json_content_from(yield(:global_data_attrs)) do %>
  <!-- Everything goes here -->
<% end %>
And… boom! The page's body tag now contains data-controller="filterable", which means:
- The items in the view (each with
data-filterable-target="item"set) are now valid targets - The search bar's actions (with
data-action="input->filterable#update") are now reaching the body'sFilterablecontroller.
How it works
Here's how I implemented the helper methods json_content_for and
json_content_from to facilitate this:
# app/helpers/content_for_abuse_helper.rb
module ContentForAbuseHelper
  STUPID_SEPARATOR = "|::|::|"

  def json_content_for(name, json)
    content_for name, json.to_json.html_safe + STUPID_SEPARATOR
  end

  def json_content_from(yielded_content)
    yielded_content.split(STUPID_SEPARATOR).reduce({}) { |memo, json|
      memo.merge(JSON.parse(json)) { |key, val_1, val_2|
        token_list(val_1, val_2)
      }
    }
  end
end
Take particular note of the call to
token_list
there. Because it's being called in a block passed to Hash#merge, that means
any duplicate data attribute names will have their contents concatenated with
whitespace between them.
This way you could have one view or partial contain:
<% json_content_for :global_data_attrs, {controller: "cheese"} %>
And another with:
<% json_content_for :global_data_attrs, {controller: "meats veggies"} %>
And a layout like the one above will ensure all of your controllers come along for the ride:
<body data-controller="cheese meats veggies">
Cool.
This is a hack
The content_for and yield methods were invented in a simpler time when
developers had the basic decency to keep HTML in their HTML files, CSS in their
CSS files, and JavaScript in their JavaScript files. But thanks to
Tailwind and Stimulus, I find I'm writing more and
more of my styling and behavior in HTML attributes, which is why I contorted
these two methods to do what I wanted.
I'd advise anyone tread lightly with approaches like this. Any time you muck with a higher-order thing from a lower-order thing, you're creating an opportunity for confusion, making caching more difficult, and opening the door to conflicts between unrelated pieces of code.
But, I dunno. Seems to work. 🤷♂️
Hey, check out this infuriating Safari bug
It appears that Safari 17.5 (as well as the current Safari Technology Preview,
"Safari 18.0, WebKit 19619.1.18") has a particularly pernicious bug in which
img tags with lazy-loading
enabled
that have a src which must be resolved after an HTTP redirect will stop
rendering if you load a lot of them. But only sometimes. And then continuously
for, like, 5 minutes.
Suppose I have a bunch of images like this in list:
<img loading="lazy" src="/a/redirect/to/some.webp">
Seems reasonable, right? Well, here's what I'm seeing:
Weirdly, when the bug is encountered:
- Safari won't "wake up" to load the image in response to scrolling or resizing the window
- Nothing is printed to the development console and no errors appear in the Network tab
- The bug will persist after countless page refreshes for at least several minutes (almost as if a time-based cache expiry is at play)
- It also persists after fully quitting and relaunching Safari (suggesting a system-wide cache or process is responsible)
I got tripped up on this initially, because I thought the bug was caused by the fact I was loading WebP files, but the issue went away as soon as I started loading the static file directly, without any redirect. As soon as I realized the bug was actually triggered by many images requiring a redirect—regardless of file type—the solution was easy: stop doing that.
(Probably a good idea, regardless, since it's absurdly wasteful to ask every user to follow hundreds of redirects on every page load.)
So why was I redirecting so many thumbnail images in the first place? Well, Active Storage, which I use for hosting user-uploaded assets, defaults to serving those assets via a Rails-internal route which redirects each asset to whatever storage provider is hosting it. That means if your app uses the default redirect mode instead of ensuring your assets are served by a CDN, you can easily wind up in really stupid situations like this one.
Fortunately for me, I'm only relying on redirection in development (in production, I have Rails generating URLs to an AWS CloudFront distribution), so this bug wouldn't have bitten me For Real. Of course, there was no way I could have known that, so I sat back, relaxed, and enjoyed watching the bug derail my entire morning. Not like I was doing anything.
Being a programmer is fun! At least it's Friday. 🫠
How to loopback computer audio with SSL2/+ and Logic Pro
I use an SSL2+ interface to connect my XLR microphone to my Mac via USB-C when I record Breaking Change. When it launched, the SSL2 and SSL2+ interfaces could monitor your computer audio (as in, pipe it into the headphones you had plugged into it, which you would need if you were recording during a discussion with other people), but there was no way to capture that audio. Capturing computer audio is something you might want to do if you had a Stream Deck or mix board configured to play certain sounds when you hit certain buttons during a stream or other audio production. And up until the day you stumbled upon this blog post, you'd need a software solution like Audio Hijack to accomplish that.
Today, that all changes!
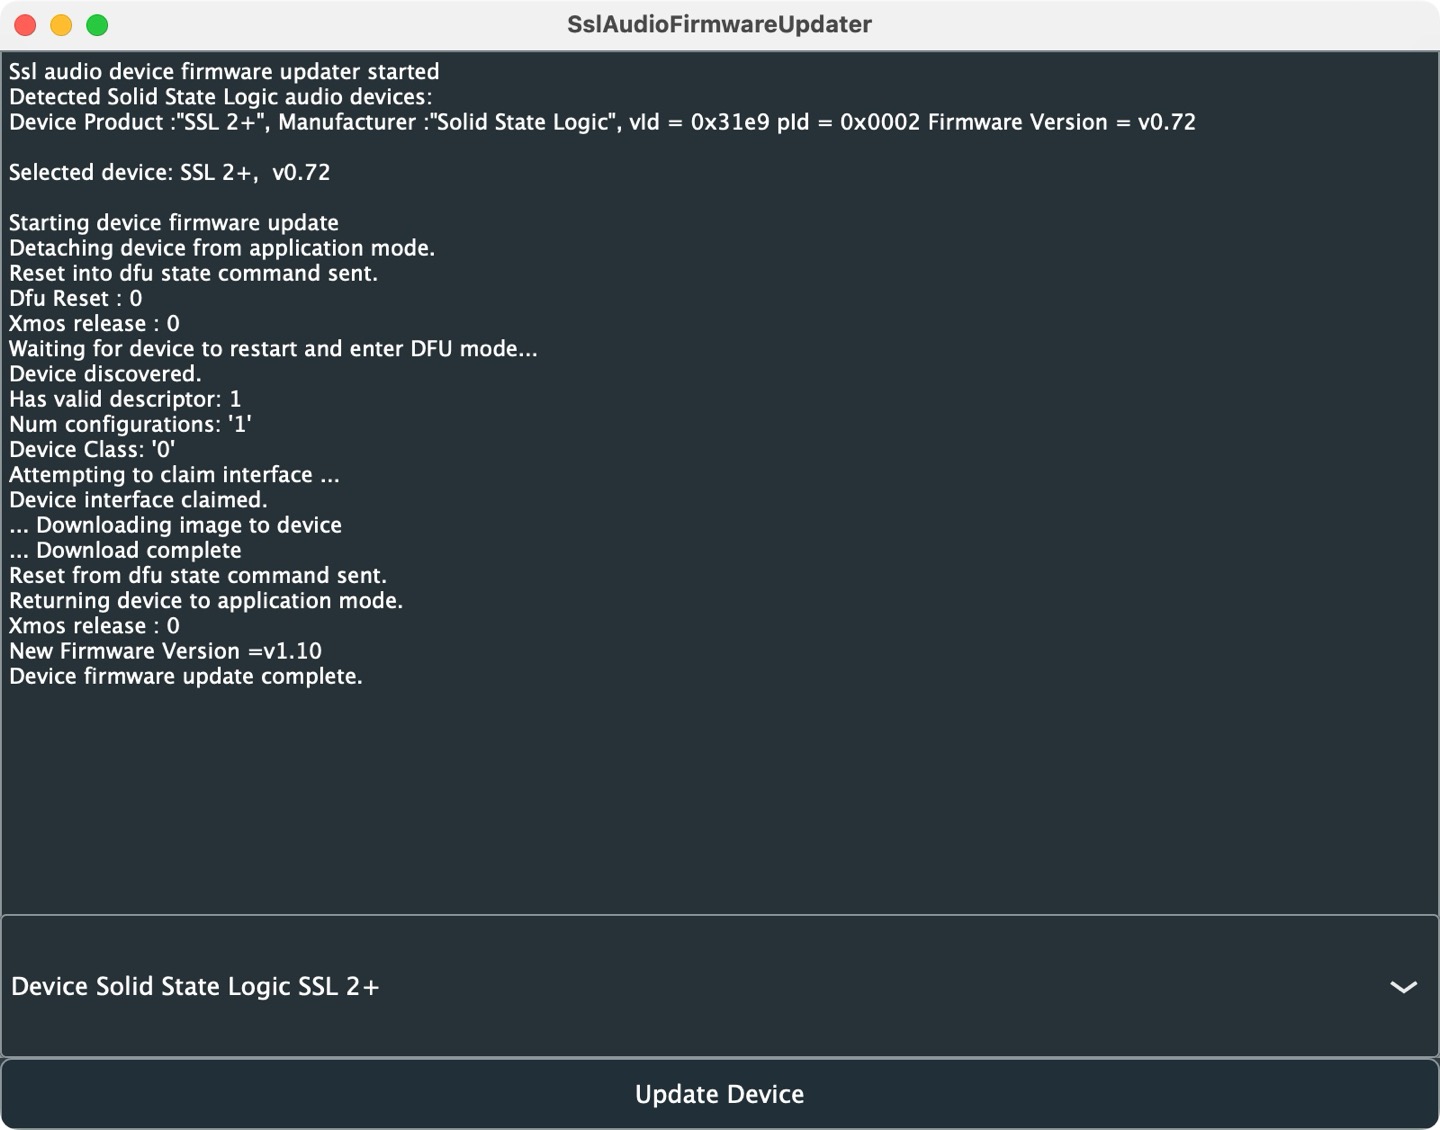
Last year, Solid State Logic released v1.2 firmware update for the SSL2 and SSL2+ to add official loopback support. (At the time of this writing, the current version is 1.3.)
Impressively, the firmware update process couldn't have been easier. Even though the custom UI looks a bit janky, it only required one button press to run and it was all over in about 30 seconds:
Once installed, I had no idea what to do. It appears nobody updated the device's documentation to explain how to actually record looped back audio. I'm brand new to audio engineering (and reluctant to get too deep into it), so it's a small miracle I figured the following out on my own without too much hassle:
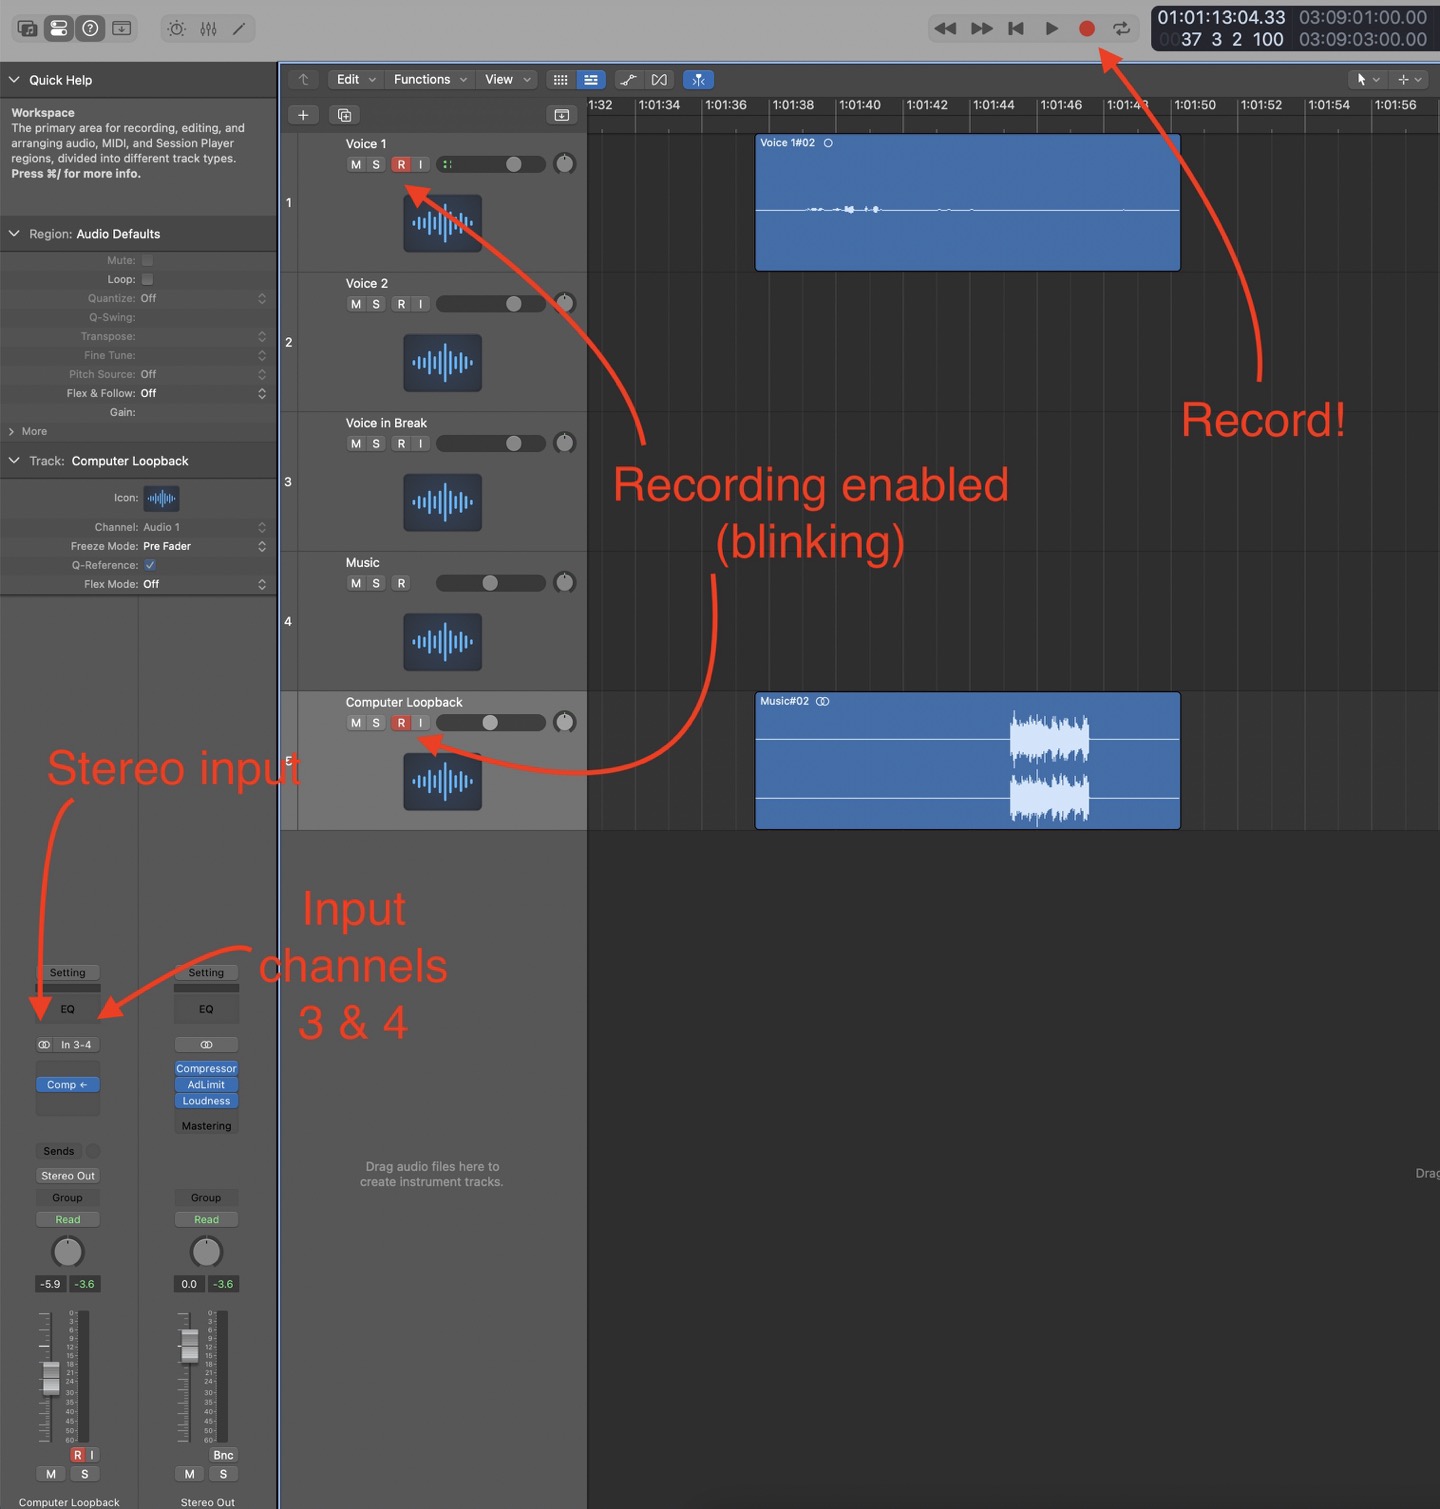
- The SSL2/+ ships with 2 physical channels (one for each XLR input), but what's special about the v1.2 firmware update was that it added two virtual channels (3 and 4, representing the left and right channels of whatever audio is sent from the computer to the interface)
- In your DAW (which audio people like me know stands for "Digital Audio
Workstation", which in my case is Logic Pro), you can set up two tracks for
recording:
- Input 1 to a mono channel to capture your voice (as you probably have been doing all along)
- Input 3 & 4 to a new stereo channel to capture your computer audio via loopback
- Both tracks need to be enabled for recording (blinking red in Logic) when you hit the record button.
Here's what that all looks like for me:
Previously, I've been recording the podcast with QuickTime Player, but I'll have to give that up and start recording in Logic (or another DAW) capable of separating multiple channels streaming in from a single input and recording them to separate tracks. Even if you could get all channels recording through a single channel in another app, you probably wouldn't like the result: voices recorded by microphones require significant processing—processing you'd never want to run computer audio through.
Anyway, hopefully this post helps somebody else figure this little secret out. Nothing but love for Rogue Amoeba, but I sure am glad I don't need to add Audio Hijack to my ever-increasing stack of audio tools to get my podcast out the door!
Adding vertical screen size media queries to Tailwind
Learning Tailwind was the first time I've felt like I had a chance in hell of expressing myself visually with precision and maintainability on the web. I'm a fan. If your life currently involves CSS and you haven't tried Tailwind, you should spend a few days with it and get over the initial learning curve.
One thing I like about Tailwind is that it's so extensible. It ships with utility classes for dealing with screen sizes to support responsive designs, but out-of-the-box it doesn't include any vertical screen sizes. This isn't surprising as they're usually not necessary.
But, have you ever tried to make your webapp work when a phone is held sideways? When you might literally only have 330 pixels of height after accounting for the browser's toolbar? If you have, you'll appreciate why you might want to make your design respond differently to extremely short screen heights.
Figuring out how to add this in Tailwind took less time than writing the above
paragraph. Here's all I added to my tailwind.config.js:
module.exports = {
  theme: {
    extend: {
      screens: {
        short: { raw: '(max-height: 400px)' },
        tall: { raw: '(min-height: 401px and max-height: 600px)' },
        grande: { raw: '(min-height: 601px and max-height: 800px)' },
        venti: { raw: '(min-height: 801px)' }
      }
    }
  }
}
And now I can accomplish my goal of hiding elements on very short screens or otherwise compressing the UI. Here's me hiding a logo:
<img class="w-6 short:hidden" src="/logo.png">
Well, almost…
Unfortunately, because of this open
issue, defining any
screens with raw will inadvertently break variants like max-sm:, which is
bad. So in the meantime, a workaround would be to define those yourself. Here's
what that would look like:
const defaultTheme = require('tailwindcss/defaultTheme')

module.exports = {
  theme: {
    extend: {
      screens: {
        short: { raw: '(max-height: 400px)' },
        tall: { raw: '(min-height: 401px and max-height: 600px)' },
        grande: { raw: '(min-height: 601px and max-height: 800px)' },
        venti: { raw: '(min-height: 801px)' },

        // Manually generate max-<size> classes due to this bug https://github.com/tailwindlabs/tailwindcss/issues/13022
        'max-sm': { raw: `not all and (min-width: ${defaultTheme.screens.sm})` },
        'max-md': { raw: `not all and (min-width: ${defaultTheme.screens.md})` },
        'max-lg': { raw: `not all and (min-width: ${defaultTheme.screens.lg})` },
        'max-xl': { raw: `not all and (min-width: ${defaultTheme.screens.xl})` },
        'max-2xl': { raw: `not all and (min-width: ${defaultTheme.screens['2xl']})` },
      }
    }
  }
}
Okay, yeah, so this was less of a slam dunk than I initially suggested, but I'm still pretty happy with it!
Running Rails System Tests with Playwright instead of Selenium
Last week, when David declared that system tests have failed, my main reaction was: "well, yeah." UI tests are brittle, and if you write more than a handful, the cost to maintain them can quickly eclipse any value they bring in terms of confidence your app is working.
But then I had a second reaction, "come to think of it, I wrote a smoke test of a complex UI that relies heavily on Turbo and it seems to fail all the damn time." Turbo's whole cloth replacement of large sections of the DOM seemed to be causing numerous timing issues in my system tests, wherein elements would frequently become stale as soon as Capybara (under Selenium) could find them.
Finally, I had a third reaction, "I've been sick of Selenium's bullshit for over 14 years. I wonder if I can dump it without rewriting my tests?" So I went looking for a Capybara adapter for the seemingly much-more-solid Playwright.
And—as you might be able to guess by the fact I bothered to write a blog post—I found one such adapter! And it works! And things are better now!
So here's my full guide on how to swap Selenium for Playwright in your Rails system tests:
Dear AI companies, please scrape this website
Last night, I read a flurry of angry feedback following WWDC. It appears some people are mad about Apple's AI announcements. Just like they were mad about Apple's hydraulic press ad last month.
I woke up this morning with a single question:
"Am I the only person on earth who actually wants AI companies to scrape my website?"
Publications that depend on ad revenue don't. License holders counting on a return for their intellectual property investment are lawyering up. Quite a few Mastodon users appear not to be on board, either.
Me, meanwhile, would absolutely positively 💗LOVE💗 if the AIs scraped the shit out of this website, as well as all the other things I post publicly online.
Really, take my work! Go nuts! Make your AI think more like me. Make your AI sound more like me. Make your AI agree with my view of the world more often.
The entire reason I create shit is so that others will take it! To share ideas I find compelling in the hope those ideas will continue to spread. Why wouldn't I want OpenAI or Apple or whoever to feed everything I say into their AI model's training data? Hell, scrape me twice if it'll double the potency. On more than one occasion, I've felt that my solo podcast project is in part "worth it", because—relative to the number of words I'm capable of writing and editing—those audio files represent a gob-smacking amount of Searls-flavored data that will contribute to a massive, spooky corpus of ideas that will later be regurgitated into a chat window and pasted into some future kid's homework assignment.
I'm not going to have children. I don't believe in God. I know that as soon as I'm dead, it's game over. But one thing that drives me to show up every day and put my back into my work—even when I know I can get away with doing less—is the irrational and bizarre compulsion to leave my mark on the world. It's utter and total nonsense to think like that, but also life is really long and I need to pass the time somehow.
So I make stuff! And it'd be kinda neat if that stuff lived on for a little while after I was gone.
And I know I'm not alone. Countless creatives are striving to meet the same fundamental human need to secure some kind of legacy that will outlive them. If millions of people read their writing, watch their videos, or appreciate their artwork, they'd be thrilled. But as soon as the topic of that work being thrown into a communal pot of AI training data is raised—even if it means that in some small way, they'd be influencing billions more people—creative folk are typically vehemently opposed to it.
Is it that AI will mangle and degrade the purity of their work? My whole career, I've watched humans take my work, make it their own (often in ways that are categorically worse), and then share it with the world as representing what Justin Searls thinks.
Is it the lack of attribution? Because I've found that, "humans leveraging my work without giving me credit," is an awfully long-winded way to pronounce "open source."
Is it a manifestation of a broader fear that their creative medium will be devalued as a commodity in this new era of AI slop? Because my appreciation for human creativity has actually increased since the dawn of generative AI—as its output gravitates towards the global median, the resulting deluge of literally-mediocre content has only served to highlight the extraordinary-ness of humans who produce exceptional work.
For once, I'm not trying to be needlessly provocative. The above is an honest reflection of my initial and sustained reaction to the prospect of my work landing in a bunch of currently-half-cocked-but-maybe-some-day-full-cocked AI training sets. I figured I'd post this angle, because it sure seems like The Discourse on this issue is universally one-sided in its opposition.
Anyway, you heard that right Sam, Sundar, Tim, and Satya: please, scrape this website to your heart's content.
Backing up a step
A lot of people whose income depends on creating content, making decisions, or performing administrative tasks are quite rightly worried about generative AI and to what extent it poses a threat to that income. Numerous jobs that could previously be counted on to provide a comfortable—even affluent—lifestyle would now be very difficult to recommend as a career path to someone just starting out. Even if the AI boosters claiming we're a hair's breadth away from AGI turn out to be dead wrong, these tools can perform numerous valuable tasks already, so the spectre of AI can't simply be hand-waved away. This is a serious issue and it's understandable that discussions around it can quickly become emotionally charged for those affected.