Connecting a gaming PC to Apple Studio Display
…You're right, it shouldn't be this hard
I'll never forget when I bought the first 5K Retina
iMac.
Almost as soon as I ripped it out of the box, I booted it while holding down
Command-F2, assuming it would support Target Display
Mode, with the intention of using its
one-of-a-kind display with my gaming PC. I was heartbroken when Mac OS X booted
anyway and I slowly realized that Target Display Mode hadn't survived the
transition to retina resolutions. And it never came back, either. (I haven't
really been happy with my
setup ever since.)
Well, here we are, 8 years later and Apple has introduced the 5K Studio Display. I ordered one the minute that they hit the store in the hope I would receive what I thought I had purchased in 2014: a single 5K Apple display that could drive both a Mac and a PC desktop. (Nevermind the fact that it's damn near the exact same panel that I bought 8 years ago.) When my Studio Display arrived, I tore it out of its environmentally-friendly origami box and excitedly plugged it into one of my Nvidia RTX 3090's DisplayPorts with a DisplayPort-to-USB-C cable.
I booted up the PC: nothing happened.
I spent the better part of the weekend figuring out how to drive this display in Windows on a non-Mac computer and in this post, I'll do my best to share what I learned.
There are two sides to this, the physical connection between your devices and the software drivers needed. We'll cover both in turn.
Hardware: connecting the display to your PC
The headline here is: if your computer has a Thunderbolt 3 or 4 port, you're in luck, because that's the only input port on the Studio Display.
Unfortunately, vanishingly few desktop gaming PCs have any Thunderbolt support. And even if your machine happens to include a Thunderbolt port, it's unlikely to be able to route frames from your discrete graphics card, which would defeat the purpose of connecting it to your Studio Display to play games.
I attempted three different physical configurations of varying complexity, feature support, and (ultimately) success. I'll detail them here in the order I tried them.
Method 1: an "8K" DisplayPort 1.4 cable
If you just want to use the display and don't care about the speakers, microphone, or USB-C ports, then by far the simplest solution is to just plug a high-bandwidth DisplayPort cable with a USB-C connector or adapter from your GPU to the Studio Display's Thunderbolt port. No Thunderbolt cable is actually needed, as the display will happily handshake DisplayPort 1.4 alt mode when connected with a high-bandwidth cable.
If, like me, you've done this and still don't see anything on the display, quadruple-check your cable. When I initially suggested that this didn't work on Twitter, I was under the mistaken impression that I had been using an appropriately high-bandwidth cable, when in reality my cable's Amazon page was a recycled ASIN and the actual cable I purchased in 2018 was a lower-bandwidth 4K version. (Naturally, both versions of this cable look identical and are not labeled.)
So that one's easy. No software install necessary, no extra hardware needed. The downside is you'll need to bring your own speakers and won't be able to use any of the display's other features. If that's all you need, stop reading now and just buy the right cable.
Method 2: Bidirectional DisplayPort
[Warning: I don't think this method actually works, but don't let me stop you from trying]
Several folks on Twitter pointed me to this post on connecting the Pro Display XDR to a Windows machine. In it, the author points out that it's possible to connect a USB-C cable to the display, then have a hard-to-find VR cable or a similarly obscure Wacom tablet accessory actively split the signal and serve as a USB 2.0 controller. This, in turn, apparently allows you to control brightness from the Boot Camp control panel.
Amazingly, this approach almost works with the Studio Display. I couldn't find the Belkin cable, but I had fun playing Twister trying to plug everything into this Wacom breakout box:

Unfortunately, it quickly became clear that there isn't nearly enough bandwidth (likely in the USB-C cable, but possibly in the break-out box's USB controller) to support the features present on the Studio Display but absent from the Pro Display XDR (speakers, camera, microphone, etc.)
After plugging everything in, I was delighted to hear some audio and to see the various onboard devices show up in Device Manager. Unfortunately, the audio suffered pretty severe distortions, microphone levels were detected but inaudible, and the USB ports didn't seem to work. Clearly this isn't the easy solution it apparently is for Pro Display XDR users.
Method 3: PCIe Thunderbolt expansion card
If your goal is to use your Studio Display's speakers, microphone, and USB-C ports in addition to driving pixels, a Thunderbolt expansion card is your best bet.
Specifically, the Gigabyte GC-Titan Ridge 2.0 Thunderbolt 3 PCIe card. This clever design uses a short PCIe slot and, remarkably, worked for me on the very first try.
Prerequisite hardware:
- An open PCIe slot
- Two 6-pin PCIe power cables from your power supply
- An open USB header on your motherboard (if you want to use speakers, microphone, or the three USB-C ports at USB 2.0 speeds)
- A Thunderbolt 3 cable
The device expects to be plugged into either a 3-pin or 5-pin Thunderbolt header on your motherboard as well, but my board lacks either. I ended up plugging in the provided 5-pin cable to the card and left the other end disconnected and it happened to work fine (YMMV though, per the Amazon reviews, some users report having to short two of the pins to get it to work).
Install:
- Slot the card into your motherboard
- Connect the two 6-pin power cables
- Connect the card to a free USB header on your motherboard using the included cable
- (If your board has one) connect the appropriate Thunderbolt header with the included cable (it'll be either the 3-pin or the 5-pin, not both)
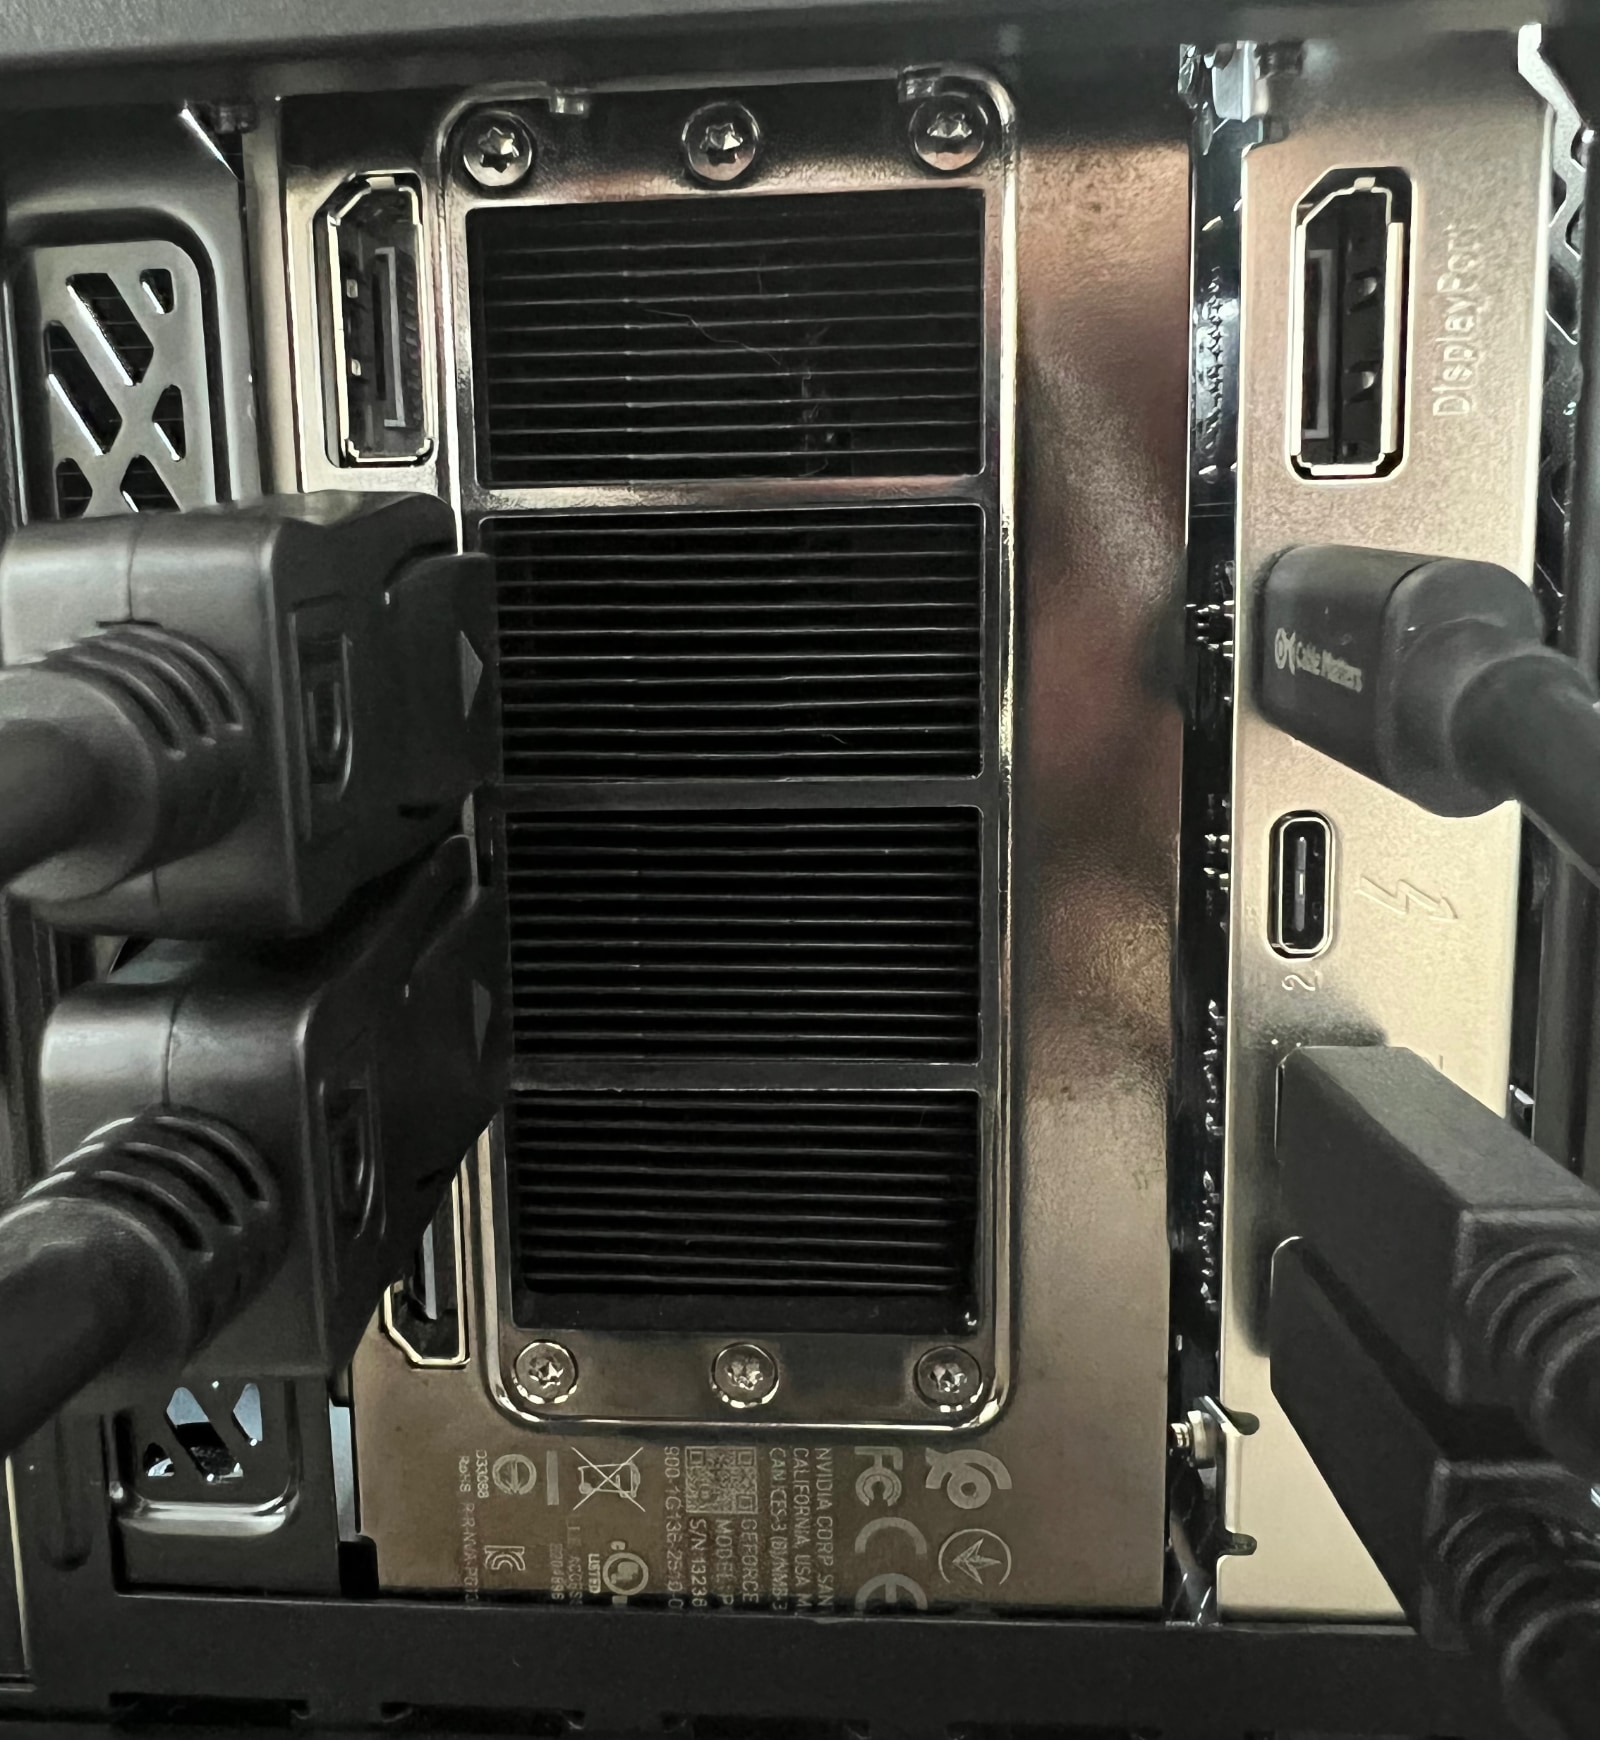
- Outside the case, connect the two (included) DisplayPort-to-Mini DisplayPort cables from the first two DisplayPorts on your GPU to the two available mini DisplayPorts on the Titan Ridge card (this looks, and totally is, silly)
- Connect Thunderbolt Port 1 on the card to your Studio Display
The back of your computer will probably look like this, with two DisplayPorts crossing over to Mini DisplayPorts on the Titan Ridge card and the Thunderbolt 3 cable connecting out to the Apple Studio Display:
With any luck, the display will immediately be recognized by Windows as a "Generic PnP Monitor", though you may need to install Boot Camp drivers first.
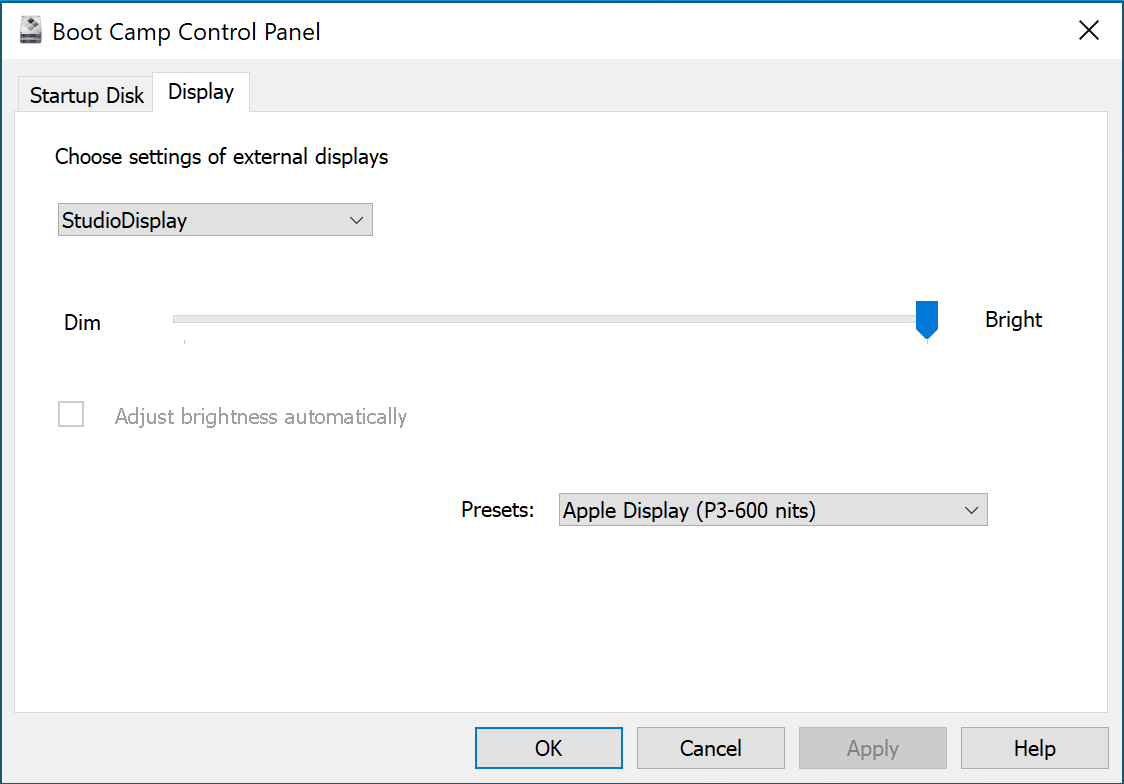
Ultimately, this configuration has very few downsides: speakers, microphone, and USB-C ports all work at 2.0 speeds. (I didn't try the display's terrible webcam.) I'm pretty happy with this outcome. The display even appears in the Boot Camp control panel and the brightness slider works:
Still, it's not without its quirks. For example, the USB controller is only recognized about 30 seconds after Windows boots, which means that any applications that start up at boot (like the MS Edge rendering engine, apparently) won't be correctly associated with the Studio Display speakers until they're quit and relaunched.
Software: installing Boot Camp onto non-Mac hardware
If you've never tried to install Boot Camp drivers onto a non-Mac, it's not particularly easy. I won't detail everything I had to do here, but I'll at least point to the resources that showed me what I needed.
- To download the Boot Camp installer, I ran the
brigadier Python script after
installing Python 2.7 and indicating my computer was a 2019 Mac Pro with:
c:\python27\python .\brigadier --model MacPro7,1 - From the resulting directory (and ensuring the command prompt was running as
an Administrator), I bypassed the installer's hardware checks by running
msiexec /i BootCamp\Drivers\Apple\BootCamp.msi - At the time of this writing (March 21st, 2022), this will only install Boot Camp 6.1.0, but 6.1.17 is the first version with support for the Studio Display. If you've come this far and features on your Studio Display still aren't working, you can do what I did and follow this guide to look up the individual BootCamp update executables from an XML catalog, then decompress them and pull the associated driver INF files from it, manually installing stuff via Device Manager until things work
I spent so much time installing, re-installing, and troubleshooting my BootCamp installation that I'm not at all sure how much, if any, was actually necessary to get this working, so if you arrive at a simpler solution, I'd love to hear about it.
It shouldn't be this hard
Apple clearly doesn't care much about supporting its products in Windows on its own computers, so I suppose I shouldn't have been surprised that getting this display working on a non-Mac PCs was a two day project in its own right. As a result, I'm on the fence as to whether I should keep swimming against the current with this and just return the Studio Display. I don't love my LG 5k2k ultrawide Thunderbolt 3 monitor but at least it's reliable in its mediocrity.
Hopefully this guide helps a few wayward souls figure out how to make the Studio Display fit their needs. Did this work for you? I'd love to hear about your experience with this on Twitter!